Showing posts with label Vintage Vogue. Show all posts

Sunday, August 22, 2010

Anniversary #2

Hi Everyone:  It's awhile since I last did a post.  I have been out of town on business (Las Vegas - I know, someone has to do it).  While it may sound exotic, it was hot, I had long days, and I'm glad to be home.


The card I'm sharing today, is the second in a line of anniversaries that are happening.


Stamps: Vintage Vogue (W – 117690, C – 118598), Punch Potpourri (Hostess Level 1)
Paper: Whisper White, Soft Suede, Always Artichoke, Pumpkin Pie, Newsprint DSP
Ink: Soft Suede, Pumpkin Pie, Early Espresso
Accessories: 2-Step Bird Punch, 2 – Step Owl XL, Sponge Dabbers, Dimensionals

Again, this card is based on the vintage technique.  The DSP is stamped with the flowers from the Punch Potpourri set in Pumpkin Pie. 
The Pumpkin Pie layer is sponged around the edges with Early Espresso and the birds (including the wings) are sponged using Soft Suede.  This technique gives the birds some dimension. 
The Always Artichoke leaves are punch and attached to the Soft Suede layer.
Lastly the birds (or should I say love birds) are attached with dimensionals.
 
Don't forget, the Summer Mini is available only until August 31st, so don't miss out.  You can still order by visiting my Stampin' Up! site or by EMAIL
 
You, too, can learn how to make these distressed flowers and achieve a vintage look for your card. Contact me to see how you can earn hostess gifts and free product by hosting a workshop
 
So until next time....
 
Karen
 

Saturday, July 31, 2010

PPA53-A Monochromatic Color Challenge

Hi Everyone.  Who can believe it that it is the last day of July!!!

Today's post is all about creating a monochromatic colour card using the colour purple.  It is not as easy as you think, however, using Stampin' Up! products, which are all colour coordinated, makes it somewhat easier. 


Stamps: Vintage Vogue, (117690 - Wood-mount, 118598 – Clear mount), Artistic Etchings (118517 –Wood mount, 120573 –Clear Mount), Perfect Punches (117202 – Wood Mount, 120516- Clear Mount

Paper: Whisper White (119707), Concord Crush (119797), Perfect Plum (119704)
Ink: Perfect Plum (101437)
Fun Accessories: Corner Punch (11987), Modern Label Punch (119849), Scallop Trim Corner Punch (11870), Scallop Trim Border (118402), 1 ¾” Circle Punch, (119850), Versamark (102283), Clear Embossing Powder (109130), Big Shot – (113439), Texturz Plates (114512)


Background on card front is watermarked using Versamark and the flourish from the Vintage Vogue Stamp Set.
Perfect Plum is punched on all four sides utilizing the Scallop Trim Corner Punch and The Scallop Trim Border Punch and run through the Big Shot with the Texturz Background Plate.
Whisper White corners rounded with the Corner Punch and stamped using the friends stamp from the Vintage Vogue stamp set using Versamark and Perfect Plum ink and embossed with Clear EP.
Concord Crush was stamped with the flourish circle from Artistic Etchings using Versamark, embossed using Clear EP and punched out with the circle punch.
Whisper White is stamped with Perfect Plum ink using Perfect Punches stamp set and punched out with Modern Label Punch.

You can order all these products HERE 24/7
 
Check out the promotion for the month of August.  Hold a workshop during the August and receive $35 in additional HOSTESS gifts with $450 in sales. This offer is not available if you order on line.  Contact me directly with your order.
 
Hold a virtual workshop - contact me for a catalogue, collect your orders from your friends and submit the orders to me.
 
So until next time.....
 
Karen


Tuesday, May 4, 2010

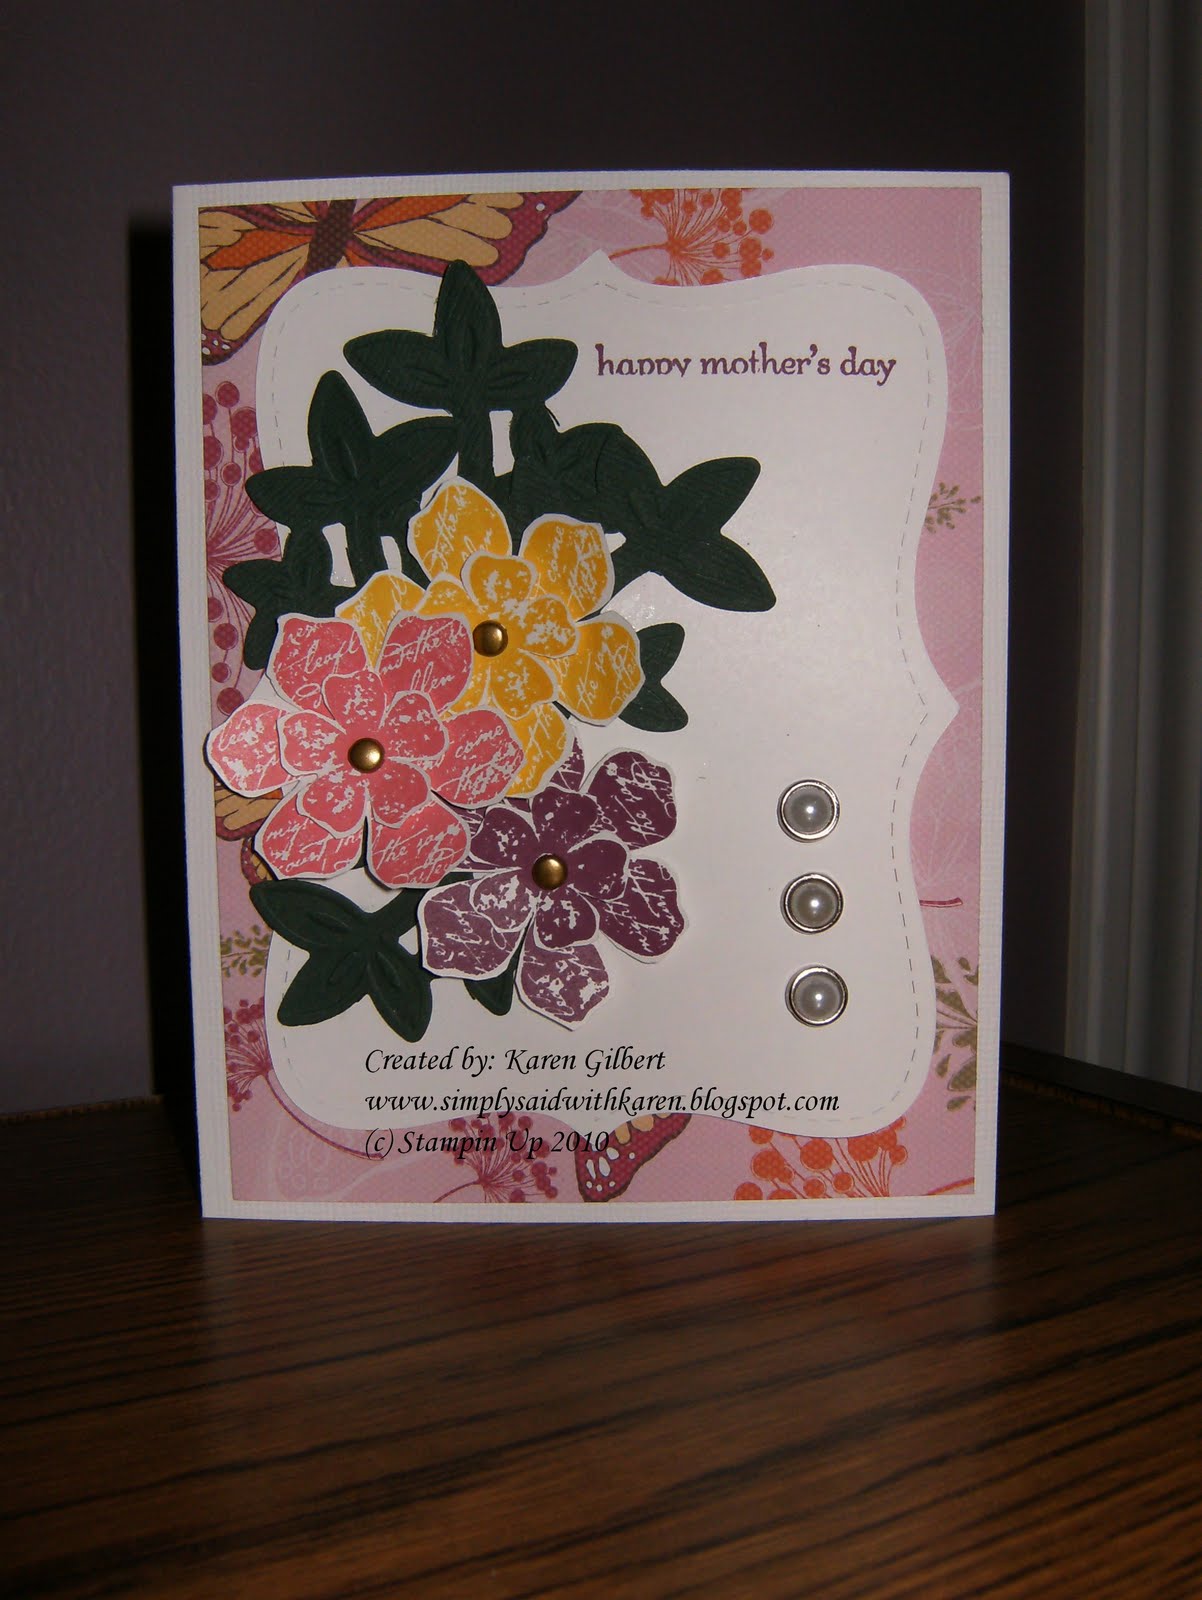
Mother's Day Part 1

Hi everyone and Tuesday is almost over.  I thought I would do a quick post this evening and then shut down the day. 

The card I am sharing today is for Lloyd's Mom.  I hope she enjoys it.  When I make these cards for others, I am sharing a part of me and that makes me feel good.  It also allows me to use the other side of my brain.

This card was cased from Silki Ledlow over at Splitcoast Stampers


Recipe


Stamps: Vintage Vogue, Teeny Tiny Wishes
Paper: Whisper White, Sweet Pea Designer Paper, Green Textured (Bazzill)
Ink: Regal Rose, Summer Sun, and Perfect Plum
Accessories: Big Shot, Top Note Die Cut, Sweetest Stem Embosslit Die, Brads (other)


1. The card base is whisper white and the dimensions are 5 1/2 x 4 1/4.

2. The DSP was cut to 5 1/4 x 4 and attached to the card base

3. The large and small flowers from the Vintage Vogue set were stamped using different ink colours, cut out with the snips and attached together using brads and attached to the top note die cut. The leaves were attached randomly behind the flowers. I chose the colours based on the DSP.

4. The pearl brads where attached and the top note was attached to the DSP.

5. The sentiment was stamped using perfect plum

Well that's it for another day.  It's off to watch NCIS...a favourite.

Until next time.........

Karen

Friday, April 23, 2010

The start of another weekend

Happy Friday everyone and welcome to the weekend and enjoy it, they go way toooooooo fast.

The card that I am posting today is for another co-worker's birthday.  Her and I have spent holidays together and quite enjoyed ourselves.  I created this card a couple of weeks ago, (trying to plan ahead) and it was based on Inspiration in Action IA 124 over at Gretchen Barron's blog... www.gretchenbarron.typepad.com

Check out her site as she does beautiful work.


Recipe


Stamps: Vintage Vogue, Happy Moments, Itty Bitty Backgrounds
Paper: Whisper White Textured, Taken with Teal, Blush Blossom, Basic Grey
Ink: Taken with Teal, Going Grey, Basic Black
Accessories: Scallop Trim Corner Punch, Big Shot, Texturz Plates Backgrounds 1 Organza Ribbon, and Dimensionals
Technique: layering

How To

1. Layer 1 Card Base – Whisper White 5 ½” x 4 ¼”
2. Layer 2 – Taken with Teal – 5 ¼” 3 1/2”. Using Big Shot texture this layer. Blush Blossom – 5 ¼” x 1 ½” and attach to the taken with teal layer.
3. Layer 3 – Basic Grey 2 3/8” x 2 3/8” – cut 2 of this layer
4. Layer 4 – Taken with Teal – 1 7/8” x 1 7/8” – cut 2 of this layer
5. Layer 5 – Basic Grey 2 ¾ x 2 ¾”.
6. Layer 6 – Whisper White – 2 7/16” x 2 7/16”. Punch the 4 corners with the Scallop Trim Corner Punch, Stamp the images
7. Attach the Whisper White with the stamped images to the Basic Grey
8. Stamp the flourish image on the 2 Taken with Teal squares and attach to the Basic Grey Square.
9. Attach 1 of the above layers to the right hand side of layer 2 and attach ribbon across the seam between the Taken with Teal and the Blush Blossom
10. Attach the 2 of the above layers to the left side of layer 2.
11. Attach the stamped image in the center of the card.
12. Stamp sentiment and attach ribbon bow to left side of card.

I hope that I can get to me stamping table and get some ink on my fingers over the weekend.  Hope you can too.

Until next time...

Karen

Tuesday, March 16, 2010

Has Spring Arrived Early

Hi Everyone:  Spring is definitely here, at least for now.  Today was a sunny18 degrees even though the calendar says Spring won't be here for another few days.  Suprises do happen, so we shouldn't get used to it.

Here is a couple of Mother's Day cards that I have created.  The first one is based on MOJO Monday 129.

Mother’s Day Card 1


Recipe
Stamps: Vintage Vogue, Teeny Tiny Wishes
Paper: Textured French Vanilla, DSP, Basic Grey, Bordering Blue
Ink: Bordering Blue, Versa Mark
Accessories: White Embossing Powder, Scallop Trim Corner Punch, Pearl Brad (other)
Technique: Emboss Resist

How To

This card uses the Emboss Resist technique. I stamped the Vintage Vogue flower with Versa Mark and embossed with the white embossing powder and then sponged with Bordering Blue ink. I only embossed the small flower, cut out and attached with the pearl brad. I stamped the swirl Vintage Vogue stamp in the corners. The sentiment was also stamped with versa mark and embossed with white embossing powder. I trimed the corners with the Scallop Trim corner punch on the 2 top layers with the basic grey showing through the scallops.


Mother's Day Card # 2


Recipe:

Stamps: Of the Earth (Hostess Set), Teeny Tiny Wishes
Paper: French Vanilla Textured, DSP, Bride Specialty Paper
Ink: Versa Mark, Bordering Blue, Brocade Blue
Accessories: Ribbon (other), Scallop Trim punch, Big Shot – Perfect Polka Dots, Dimensionals
Technique: Brayering, Emboss Resist

How To

This card was based on Saturday Sketch Challenge 142, another great choice for that stamper block.


I embossed the 2nd layer with the Perfect Polka Dots impressions folder and then layered the DSP, the brayered Bride specialty paper, trimmed the 5th layer with the scallop trim punch and stamped and emboss resist the sentiment. I then stamped the last layer with the bird from the Of the Earth stamp set and edged with Brocade Blue ink.

Now I have 2 Mother’s Day cards and will have to decide who will receive which one.


 I hope Spring is coming in your area and you are enjoying as much as I am, although we were very spoiled during the winter.

Have a great evening

Karen


Sunday, February 28, 2010

Last Day for the Olympics

Well, it's the last day for the Olympics and what a ride it has been.  I don't think I have heard the Canadian anthem sang so many times and spontaneously at that.  Canadians are usually so reserved when it comes to showing their patrioism.  I do hope this overwhelming pride for Canada continues.  Right now the US/Canada Gold Medal Hockey game is on and it's tied and will be going to overtime.  Should I watch or should I not. How could I not watch.  Well, the hockey game is over and Canada has won the gold medal.  YEH Canada.  Congratulation to all the athletes who took part in the Olympics.  To be able to represent one's country is a privlege and you all deserve to stand on a podium.

Well, I have had time to make two cards this week.  I am not sure how, but make them I did.  The first card is for a very special person in my life whose birthday is next month.  OK, if she reads the blog she will likely know who it is.  However, I want to share because I think it turned out beautiful.

Card Making Recipe - all products are Stampin Up unless otherwise noted

Stamps: Vintage Vogue, Vintage Labels, Hello
Paper: Whisper White Textured, Taken with Teal, Perfect Plum, Kiwi Kiss, Whisper White
Ink: Perfect Plum, Taken with Teal
Accessories: New Scallop Edge Punch, Circle Punch - 13/4, Rhinestone Brads (other)
Technique: Layering, Easel Card

I stamped the Vintage Vogue stamp on the whisper white with perfect plum to make my own designer paper.  The link for the Easel Card Tutorial is http://www.splitcoaststampers.com/resources/tutorials/easelcard/

This card took be 3 trys as I didn't read the instructions properly.  And it wasn't the instruction's fault either as they are easy to read.   Oh well, 3rd try lucky!!


The second card I did this week is a Sympathy Card for a co-worker whose Father passed away suddenly last week.  I just want her to know that I am thinking of her in this time of sorrow.

This card was to be for Mojo Monday 127 but again didn't read instructions as it is supposed to be a square or a circle, mine turned out rectangle....oh well.

Card Making Recipe

Stamps: Asian Artistry, Teeny Tiny Wishes
Paper: Brocade Blue, So Saffron, Vellum, Whisper White Textured, DSP
Ink: Black, Stazon Black
Accessories: Gold Brads (other), Whisper White ribbon


Well, I have been quite lengthy today. 
One more thing though.  I have made a new friend from Split Coast Stampers, Sandi MacIver.  We started corresponding and Sandi is from Kamloops as well.  Her link is on my blog.  Take a visit, as Sandi does wonderful work.

Well, that's it for today.  Take care.

Karen